Dry Fit Day…

…is my favorite day in the time it takes to make a painting. It is my made up name for the day where I get to see the painting in its forever home for the first time.

There is always a two step going on in process of making a painting, the painting itself and the frame that will house it. Popping off the clamps, I get a bit excited to know that those two tracks are coming together.

It’s a great feeling to not only see what the finished work will look like, but often gives me a little boost to get over the last pile of hours and finish the painting.

This one is going to the 20 Year Anniversary Show at RLS Gallery, opening this Friday from 5-8pm at 2 Queen St. I can’t begin to explain how grateful I am for Megan, Rob, Curry, and the entire RLS team over these years for enabling me to pursue my passion and make it my living.

If you’d like to see the (hopefully) finished painting, please come by and celebrate with us! But just be warned, the painting will probably still be wet…

People Often Ask…

…how I start a painting. Hopefully these stories that I am sharing set the scene about where a painting comes from, but sometimes that question is more of a technical one. As in, how do I start a painting. In that case, I use a charcoal transfer to create a heat map of lights and darks.

I start with the reference photograph scaled to match the size of the painting and printed in black and white. I then cover the back of the printout in charcoal and tape the it to the surface of the painting, with the charcoal against the painting surface. Now I trace the out the areas defining the lights and darks. Every mark I trace (usually in colored pen to help me see the marks I’ve made) on the photo gets transferred to the painting surface in charcoal.

I like to think of the result as a topographic map of light and dark. Sometimes it looks like nothing at all, sometimes it is a pile of spaghetti, and sometimes it can look like a paint-by-numbers without the numbers. But its function is to help me quickly define shapes. To know what those shapes are, I usually go back in with straight diagonal lines to define the areas of light and dark. Just like cross-hatching, more lines equal darker areas while no lines are the lightest ones.

This process also tells my future. If it is quick and easy and I can get it done in a studio session, the painting is usually around 50 hours of painting time. If it takes me a few days to map out, then the painting will be measured in hundreds of hours of painting time. And if it takes me a week, well, there goes my next year (it has happened).

After Deciding on a Shape...

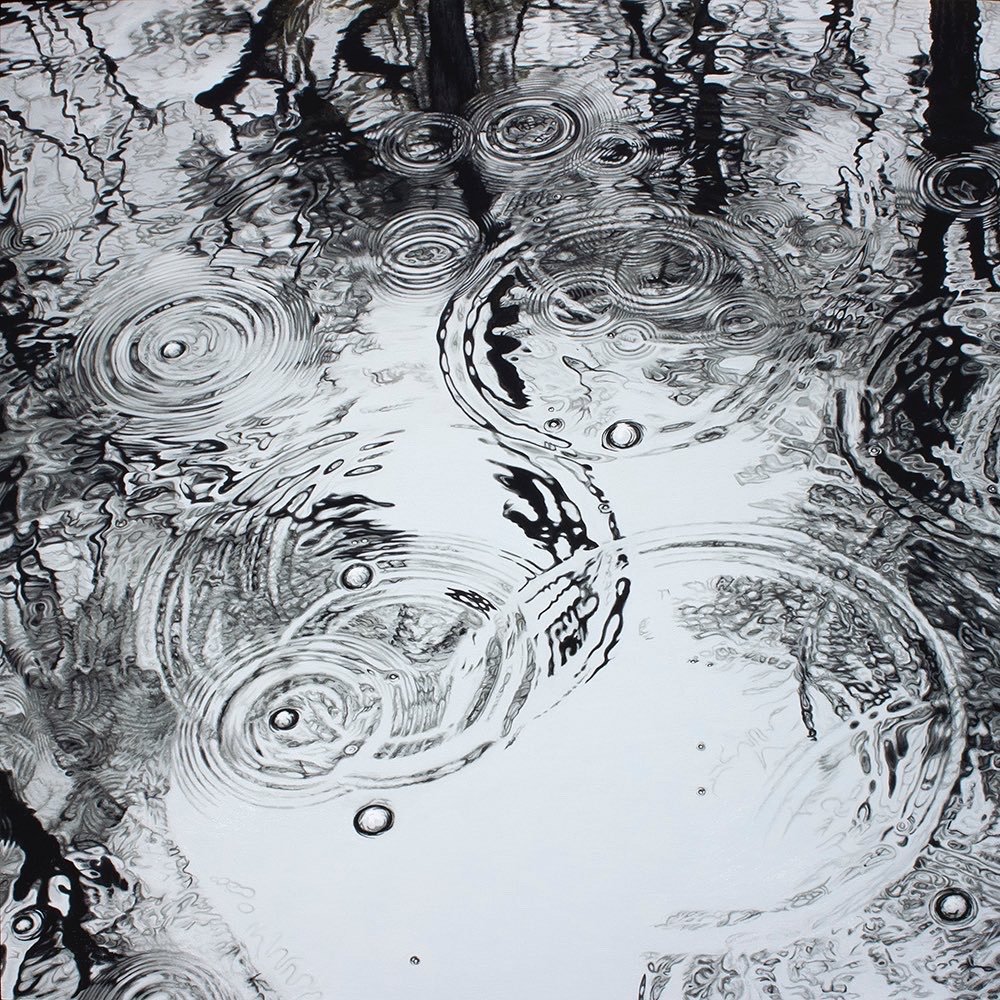
After deciding on a shape, the square, and size, an intimate 6x6”, I set about to making it happen. I used a black and white photograph with the back covered in charcoal to sketch a quick heat map of light and dark.

The first layer of paint is a rough draft, a chance to learn color and shape. After giving it time to dry and using that as an opportunity for me to stare at it, deciding where it needs to go, I sanded it smooth to reset the surface for the  second layer of paint.

The second opaque layer of paint is all about refinement, subtly shifting the color and spotting the shapes to mimic the splendor of nature. Finally I floated a tiny amount of pigment in the transparent glaze layer to evoke the depth of this wispy and mercurial subject.

For the Better Part of a Decade...

…I lived on an island you could only get to via boat. There was little better than having my morning coffee on my dock, waving to passing yachts, feeling well above my true tax bracket. But all good things come to an end, and when I knew my time living on Goat Island was coming to a close, I set out to document my favorite place there, Grey Bay. She is well suited to her namesake color, for Grey Bay is ever changing with tides and light, and I wanted to capture it all.

I set up a ladder so that I could get a better perspective to look back into the marsh perched 15’ in the air. This also served as a tripod, and a system of nestled buckets as a tripod head. Without getting into to much detail, the buckets reduced parallax errors (close one eye, hold up a finger at arms length, then slowly move your head from side to side; the moving finger is a parallax error) and allowed me to shoot a controlled series of photographs across the landscape. I would shoot one set of the sky, then another at a different exposure for the ground. Back in the studio, I stitched them together with the aide of Photoshop for one continuous image.

I loved this spot, and would go out to capture the golden hour, through dusk, and into the dark of night at times. Sometimes if I realized that there was nothing worth photographing that day I would just stand on the top of my ladder, watching the colors change as the light bled from the sky. It was all for a series of four paintings that depicted Grey Bay from low tide in late afternoon to a full moon flood tide at night. But there was one image which caught me, but did not fit as a painting.

The reason I could never see myself painting this photograph was that it is a cloud that couldn’t possibly exist. In fact, it only did for only a minute or two before being pulled apart by the wind. It is something that existed better as a photograph, in all its glorious detail. But  then RL•S invited me to be a part of a group show inspired by the theme of clouds. I’ve painted hundreds of clouds. I once spent an entire semester in college in the late nineties just painting clouds. I realized they were a weak spot in my landscapes, and what I needed was practice to emulate the Dutch landscape painters around the turn of the 19th century. Mine were nowhere near as good, but it was a start for what has become decades of practice.

So I combed my archives of photographs, went out and shot clouds for the sole purpose of this show, and yet still kept coming back to the reflected cloud image. I played with different crops, different shape of paintings, and what I realized is that without the landscape, without the thing that gives this cloud scale, and maybe admittedly without the headache of painting its reflection between the spires of grass, I slowly came around to the idea of it as a paining. (To be continued…)

The Frame For...

…Pipedream also has a story. I live in and am renovating a house from the 1800s. The wood that it was built from is probably first cut, old growth pine. It is also known as heart pine because of the cut pattern used to mill the log into boards.

When I removed parts of the original walls and floors, I carefully kept the beams for later use. In this case, I milled these down again to a frame width, planed them to a uniform width, then used the stock to build the frame by hand.

The rough texture along the front is the original rough hewn cut pattern from the mill which turned the tree into many boards over a century and half ago. This leaves the side of the frame highlighted with the tight growth rings seen in heart pine.

Each Painting…

…progresses at its own pace. Some are maddeningly slow and filled with stops and starts. Some just seem to flow from one stage to the next without pause. But there is always contemplation.

The challenge in this painting was in keeping a limited palette, but still catching the depth of saturation of those Bahamian blues.

If you’ve never seen the colors there, just the flight in is worth the price. Don’t believe me? Look at the islands from google earth and you’ll see color unlike anything else on the globe. It is mesmerizing.

So I would have to say this painting was more of flow, and living in those colors for the time spent was simply a treat. If you would like it to be yours, it can be!

untitled seascape 31 (pipedream) 20x20” oil on aluminum 2021

You Don’t Make It…


…as an artist by yourself, and the support of my friends and family has meant the world to me. Without them, and without patronage, I would not be able to do what I do. I am very lucky to have all three, and especially for what I do, which is paint water, it helps to have friends with boats. When my good friends Chris and Bruce asked me to sail their lovely boat back from The Bahamas to Charleston, I jumped at the chance, gathering a mix a friends and family to help me sail her back.

Halfway through the trip, and not an hour after we lifted anchor and decided to jump off the Bahamian shelf to make the big sail back, the motor died with an ominous puff of black smoke. Once again, it helped to have friends who were not flustered, but leaned into adventure and decided to continue to sail.

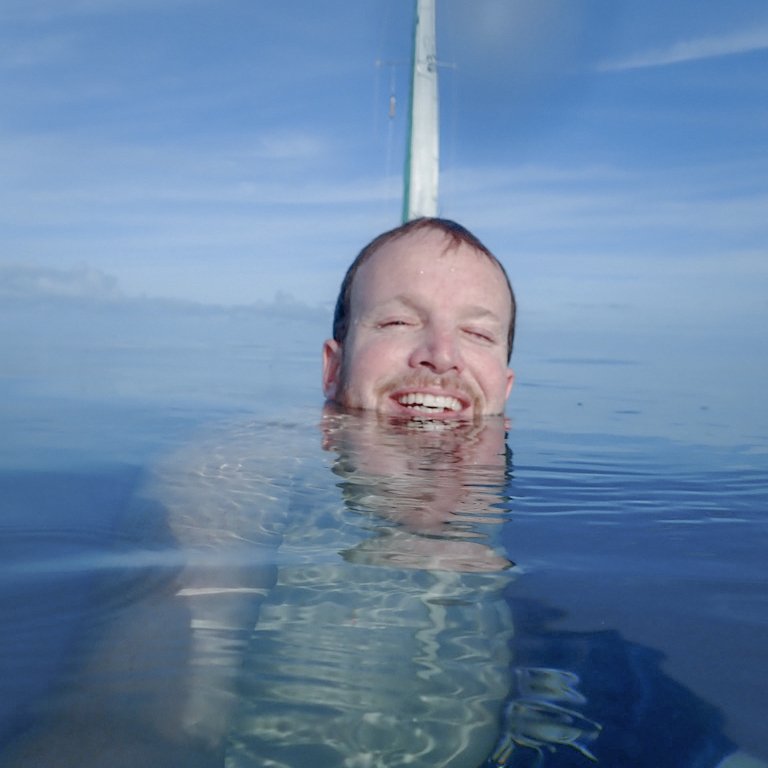
It was also nice they barely rolled their eyes as I slipped into the water to swim like mad ahead of the boat, camera in tow, when I realized we were becalmed and in the middle of a 16 mile reflection pool. Even a becalmed boat creates ripples, so to get an absolutely flat expanse, I had to get away from the boat. This image is the result of the swim, and the inspiration for Pipedream, a 20x20” oil painting on aluminum (process posts to follow).

And while out in the middle of it all, it is a nice to be able to put your feet up and realize just how beautiful life is, especially with great friends. Thank you, all of you, for helping me become who I am and allowing me to do what I do.

It Has Been Nearly Four Years...

…since I have regularly posted to my blog. It is not that there hasn’t been a lot going on in and around the studio, but it isn’t always about painting, and I wouldn’t change a minute about the last four years and giving most of my time to being Violet’s dad. So before I get back in the habit of regular updates on my studio life, I thought you might enjoy a few pictures on what else has been going on there.

Artfields Is Open!

Artfields is open! If you are anywhere near Florence, SC drop by its neighbor to the southeast, Lake City, where 370 artworks from the Southeast are displayed in over 40 venues around town.

There are all sorts of events, talks, and performances until Saturday, April 30th. If you go, find the cool tank sculpture, and take a peek inside for one of many unsuspecting Lake City surprises.

From there your can’t miss the green building filled with tasty beverages, and after sampling a few, head to the building with the blue awning in the background. My painting is hanging there, with the lovely people at ProMotion Rehab and Sports Medicine. Even better, drop by the Welcome Center at 110 East Main Street to register to vote for my painting, u.s. 135 (dream the wheel) with Artfields ID#229795!

I Have A New Studio-Mate.

She can be caterwauling loud and often makes a stink, but I’m going to keep her anyway.

C86911C7-0F90-4468-AD29-3ADEAA08CE3D.jpeg

Friends, can I introduce you to Violet Ashton Boyd?

FE1CE8E6-7AEC-42E1-99F8-374477772BDD.jpeg

Born on December 28th at a dainty 6lbs and 13oz, she is completely the apple of her Dad’s eye.

ABBE1401-C5BA-428F-9467-BA7094B202F9.jpeg

After Sanding…

…the first layer smooth, I’m onto painting in the second layer.

1A40FDDD-1957-4985-BBF9-34CC550DD3E2.jpeg

Here I’m smoothing out the transitions of color in the sky to make it subtler and more atmospheric.

CC6E8AB1-5ABC-403E-84AE-6482BF434625.jpeg

It’s somewhat amazing to see how little color is on the palette, and then see how much shows up in the sky in the finished version. Often less truly is more.

D9276AA4-DD4C-42F8-B6D2-E76D5D7272C2.jpeg

Someone Asked Me…

…about my last post, specifically what “blocking in the first layer” means.

31481FFC-792F-4B77-B78A-0A09103AD99D.jpeg

I thought it was a great question, so here are three photographs of the painting process and two reference photos to show how I focus on the big shapes, colors, and areas of light and dark.

C0486313-1FF1-42D5-AA99-1CF273DFB76F.jpeg

It’s big brush strokes (for me) and trying to get as much information down without spending time obsessing about details or filling in each and every crevice.

C5B1C793-62DF-4C3A-ABB9-4783721D60FA.jpeg

To help this along, I even blur my reference photograph so I don’t have that information to paint in, as shown in the next two images.

AF8DAA89-7591-4225-B651-B74CA7D3F787.jpeg

Now that the first layer is done, I stare at it for a week or two, then sand it smooth and paint it again. The first layer is like a rough draft, while in the second I sweat the details and make it realistic as possible.

F311D3A2-D5AA-461B-A46C-F4121FC14109.jpeg

There’s Nothing Like…

…a fall weekend in the mountains to recharge your batteries and get you connected back to nature. A short hike to a remote cascade was all it took for me. Not sure there is painting in this, but it was beautiful.

C81F7857-CB28-41A7-9FCA-B68DC449A64C.jpeg

I’m Blocking In…

...the first layer of paint of this marsh scene.

9F1FA655-4C54-4692-A956-67A958334AC5.jpeg

The goal is to quickly get down a color-scape, keeping to general shapes. In the second layer, I’ll tighten the detail to sharpen the realism of the painting. 

2EAAD7A0-1F3D-443F-80CF-1A80CFE81AC2.jpeg

I Don’t Know…

…what the plant is that creates the field of red in the center, but it sure is pleasing to paint. I’ll get one more try as this is the first layer of this little 3x11” painting.

9269FB97-871B-4104-AF7F-D74B825CD257.jpeg

The Second Layer…

…of paint is finished, and this one is just hanging out to dry. In a week or so it will get a glaze to add a little more foggy atmosphere, then a varnish and a frame!

BoydJB_us30(Stowaway)_oilonalum_20x20_2020_6000.jpeg
64CA31A0-513A-46EC-A18E-4B9DB095B15D.jpeg